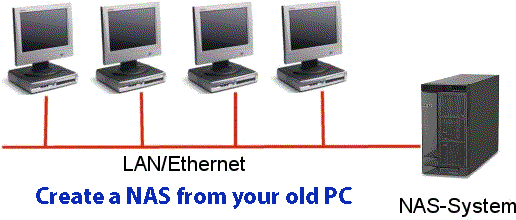
Create a NAS from your old PC
We all have come across the running out of storage space scenario at some time and we hate it a lot. One most common used solution to this problem is to use a NAS. To create a NAS, you don’t need to spend a lot of money.
Did you know if you had an old PC lying around, you could turn it into a Network Storage Solution (NAS) ? Depending on how old your PC and other factors about your PC are.
If you have a spare computer lying around in the Garage, you could Turn your old PC into a Network storage Solution for your home network. With your own storage solution you can share your data with your Windows, Mac or Stream your digital media files across your home network from your old hardware. All you need is a few hard disk drives and FreeNAS Operating System.
What is FreeNAS ?
FreeNAS is an Open source Operating System. It is a very powerful OS with lots of features. The possibilities are endless with freeNAS . Basically, with FreeNAS you will be able to build your very own network attached storage solution on practically any hardware you have.
The Benefits
1) Using Freenas will save you money on complicated Network storage devicesEasy to use and setup.
2) Protect your data.
3) Encrypt your data.
4) Backup your computers image to your FreeNAS Device.
5) File sharing across your windows and mac users.
6) Control the Operating System from your own PC.
7) Plus many Plugins to provide additional features.
How to Build your Own NAS
Requirements
An old PC, here is the list of compatible equipment.
For this demonstration, I am using an old PC of mine.
Getting Started
For this how to guide, I will be showing you how to install the Operating System, setup your hard drives and share your drives from a Windows based Computer. Ensure that your Computer is attached to a Network. It is highly recommend to connect via Ethernet Connection.
1. First we need to grab a copy of FreeNAS operating system and install the image onto a blank USB drive.
2. Ensure that the BIOS is set to read the USB Drive first, so that the computer will be able to install the Operating System from USB.
3. The Operating System will begin to start, It is recommended to install the Operating System on a USB Flash Drive and use your Hard Drives for storing your data.
4. Once you have selected the correct boot order save the settings and restart your computer. The computer will start to read the USB and load the Operating System.
5. Once the Graphical user interface starts, the wizard will prompt you to install the Operating System onto USB media. You will then be required to confirm to install the Operating System onto the USB Media as shown below.

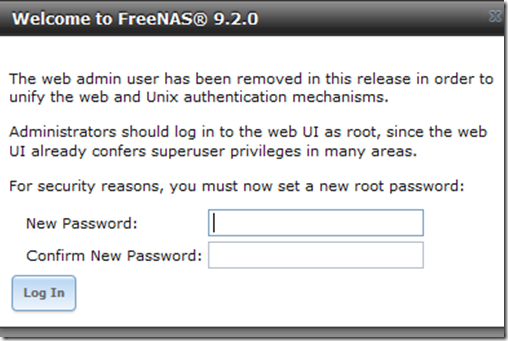
6. The Installation will then proceed. When it has been completed, the Operating System will then prompt you to configure the NAS computer from another computer on your network. This computer could be your everyday PC Such as your Laptop or Desktop PC. This is from where yo control everything about NAS. Open your web browser and enter the IP address that the computer told you to use. In my example we are using the address 192.168.0.3
8. When you type in the address you will be prompted to create a new password as shown in the image below
Setting up your Storage
There are lots of features on how you can setup your data. You can setup a RAID which basically allows you to duplicate your data to another hard drive. If the drive was to fail, you will have a backup of existing data.
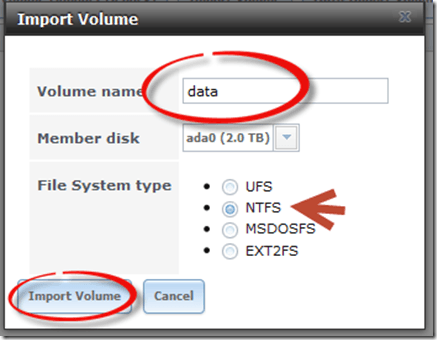
Import your Existing Data
If you want to use your old hard drives with your existing data on it, you can. It is really easy to setup.
1. In the web console interface, select the storage tab
2. Then Select the Import Volume tab on top right.
3. It will then ask you to give it a name so you can identify what the content is.
4. Then if it is a NTFS volume, Select NTFS and then Select Import.
That’s it your Data is now available. You will then need to create a new User and Network Share to be able to access the drive from any computer on the network.

Configuring CIFS Share for a Windows Based Computer
Configuring CIFS Shares can be complex, here is a quick and simple video walk through guide on how to configure Freenas to share your hard drive across Windows Network.
If you have followed this information, you shouldn’t have much issues in getting your NAS Storage up within a weekend. If you ever get stuck there are a few resources on the Freenas website which can help you out.
![]()