Bios password reset
When a laptop is locked with password, a checksum of that password is stored to a so-called FlashROM – this is a chip on the mainboard of the device which also contains the BIOS code and other settings, e.g. memory timings.
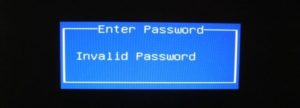
For most brands, this checksum is displayed after entering an invalid password for the third time:
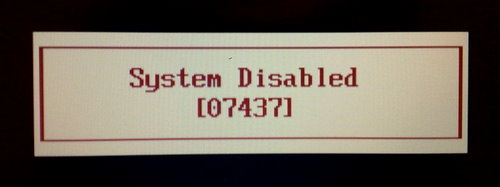
The dramatic ‘System Disabled’ message is just scare tactics: when you remove all power from the laptop and reboot it, it will work just as before. From such a checksum (also called “hash”), valid passwords can be found by means of brute-forcing.
The bypass mechanisms of other vendors work by showing a number to the user from which a master password can be derived. This password is usually a sequence of numbers generated randomly.
Some vendors resort to storing the password in plain text onto the FlashROM, and instead of printing out just a checksum, an encrypted version of the password is shown.
Other vendors just derive the master password from the serial number. Either way, my scripts can be used to get valid passwords.
A few vendors have implemented obfuscation measures to hide the hash from the end user – for instance, some FSI laptops require you to enter three special passwords for the hash to show up (e.g. “3hqgo3 jqw534 0qww294e“, “enable master password” shifted one up/left on the keyboard). Some HP/Compaq laptops only show the hash if the F2 or F12 key has been pressed prior to entering an invalid password for the last time.
Depending on the “format” of the number code/hash (e.g. whether only numbers or both numbers and letters are used, whether it contains dashes, etc.), you need to choose the right script – it is mostly just a matter of trying all of them and finding the one that fits your laptop. It does not matter on what machine the script are executed, i.e. there is no reason to run them on the locked laptop.
This is an overview of the algorithms that I looked at so far:
| Vendor | Hash Encoding | Example of Hash Code/Serial | Scripts |
|---|---|---|---|
| Asus | Machine Date | 01-01-2011 | pwgen-asus.py |
| Compaq | 5 decimal digits | 12345 | pwgen-5dec.py Windows binary |
| Fujitsu-Siemens | 5 decimal digits | 12345 | pwgen-5dec.py Windows binary |
| Fujitsu-Siemens | 8 hexadecimal digits | DEADBEEF | pwgen-fsi-hex.py Windows binary |
| Fujitsu-Siemens | 5×4 hexadecimal digits | AAAA-BBBB-CCCC-DEAD-BEEF | pwgen-fsi-hex.py Windows binary |
| Fujitsu-Siemens | 5×4 decimal digits | 1234-4321-1234-4321-1234 | pwgen-fsi-5x4dec.py Windows binary |
| Fujitsu-Siemens | 6×4 decimal digits | 8F16-1234-4321-1234-4321-1234 | pwgen-fsi-6x4dec.py |
| Hewlett-Packard | 5 decimal digits | 12345 | pwgen-5dec.py Windows binary |
| Hewlett-Packard/Compaq Netbooks | 10 characters | CNU1234ABC | pwgen-hpmini.py Windows binary |
| Insyde H20 (generic) | 8 decimal digits | 03133610 | pwgen-insyde.py Windows binary |
| Phoenix (generic) | 5 decimal digits | 12345 | pwgen-5dec.py Windows binary |
| Sony | 4×4 hexadecimal digits | 1234-1234-1234-1234 | pwgen-sony-4×4.py |
| Sony | 7 digit serial number | 1234567 | pwgen-sony-serial.py Windows binary |
| Samsung | 12 hexadecimal digits | 07088120410C0000 | pwgen-samsung.py Windows binary |
The .NET runtime libraries are required for running the Windows binary files (extension .exe). If the binary files (.exe) don’t work out for you, install Python 2.6 (not 3.x) and run the .py script directly by double-clicking them. Make sure that you correctly read each letter (e.g. number ‘1’ vs letter ‘l’).
You can also calculate the passwords with your browser: http://bios-pw.org/ (sources).
Also, be aware that some vendors use different schemes for master passwords that require hardware to be reset – among them are e.g. IBM/Lenovo. If you find that your laptop does not display a hash or the scripts do not work for you for whatever reason, try to:
- use a USB keyboard for entering the password for avoiding potential defects of the built-in keyboard,
- run CmosPwd to remove the password if you can still boot the machine,
- overwrite the BIOS using the emergency recovery procedures. Usually, the emergency flash code is activated by pressing a certain key combination while powering on the machine. You also need a specially prepared USB memory stick containing the BIOS binary. The details are very much dependent on your particular model. Also, be aware that this can potentially brick your device and should only be done as a last measure.
- Some dell service tags are missing the suffix – just try the passwords for all suffices by adding -595B, -2A7B and -D35B to your service tags.
- Unlocking methods for some Toshiba laptops are described here (edit: gone).
- Some older laptop models have service manuals that specify a location of a jumper / solder bridge that can be set for removing the password.
Special thanks to Dogbert’s Blog
Method 2 – CMOS Battery
Most computers have a small battery installed on the motherboard called a CMOS battery. This little battery is used to keep the time and store BIOS settings even when the computer does not have power. If you decide to change the boot order, disable a USB device or even set a BIOS password, it would all be pointless if the settings disappeared when you turned off your computer and unplugged it.
In older computers, the CMOS battery was responsible for this, but in newer computers, the BIOS and settings are stored in nonvolatile storage like flash memory or EEPROM. This type of storage doesn’t require power and therefore doesn’t have any limitations like the CMOS battery. Mostly the CMOS is used for maintaining the real-time clock for the computer.
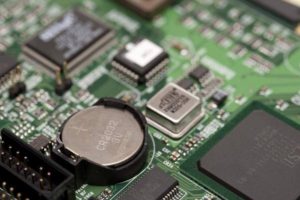
Basically, the chances of this working on a modern computer are pretty low, but it’s worth a shot because the other options are more complicated. You’ll have to open your desktop case or laptop panels and find the circular silver battery. Thankfully, it’s easy to spot because of its size and shape.
Make sure you turn off your computer completely, disconnect all cables and unplug the power also before doing this. Use something like a butter knife or flat head screwdriver to pop the battery out. You’ll want to wait at least 30 minutes before putting the battery back in and connecting everything back up.
Unfortunately, on some laptops and newer desktops, you may not even see the CMOS battery anymore. In that case, move on to the next method.
Method 3 – Change Jumper Settings
The third option will probably be the best chance you have of getting rid of the BIOS password on modern desktops and laptops if the first method didn’t work. If you have a laptop, you may have to call a technician because you’ll need full access to the motherboard, which means you’ll have to probably take the entire thing apart.
When you have access to the motherboard, you need to look for a specific jumper. A jumper is basically a number of pins sticking out of the motherboard with a small piece of plastic covering some of the pins. When you move that piece of plastic to cover a different set of pins, it changes the settings on the motherboard.
On most motherboards, even the new ones, you should see a jumper with a label next to it to clear the CMOS or clear the password. Now the label can be any of the following: CLR_CMOS, CLEAR CMOS, CLEAR, CLEAR RTC, JCMOS1, PWD, PSWD, PASSWORD, PASSWD, CLEARPWD, and CLR.
![]()
There are many jumpers on a motherboard, so you’ll need to search around to find the right one. The best place to look is around the edges of the motherboard first. If not there, look close to the CMOS battery itself. Usually, the jumper will consist of three pins with two pins covered. You’ll need to simply remove the jumper and cover the opposite two pins.
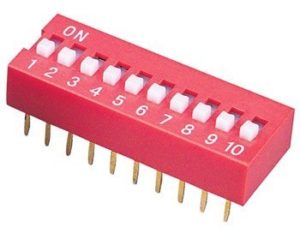
For example, if pins 1 and 2 are covered, you will need to remove it and cover pins 2 and 3. If there are only two pins for the jumper, just remove the cover completely. On a laptop, you may not see jumpers, but dip switches instead. All you have to do here is move the switch up or down.
Once you have changed the jumper setting, go ahead and turn on the computer, check that the password is gone and then turn it off again. You can then put the jumper back into its original position.
Method 4 – Default BIOS Passwords
If nothing else has worked so far, you can always try to use some generic or default passwords set by manufacturers. Instead of listing them all here, check out this page that has a list of all the default passwords.
Method 5 – CMOSPwd
If you’re lucky and the password is only protecting the BIOS utility and isn’t required to start Windows, you can try a third-party program that will try to decrypt the password.
http://www.cgsecurity.org/wiki/CmosPwd
The software works with all the major brands like Phoenix, IMB, ACER, AMI BIOS, Compaq, Toshiba, etc.
At this point, your only option is to use a professional service to break the BIOS password. They have special tools that they can use to actually remove the BIOS chip from the motherboard and flash it with a new BIOS, thereby removing the password, etc. It’ll probably cost you anywhere from $100 to $500 depending on the firm. Enjoy!
![]()
